Wednesday, October 20, 2010

50 High Quality Android Wallpapers

Download 50 High Quality wallpapers for next gen Mobile Operating System Android


Click here For Download

Saturday, October 16, 2010

How to Enable Multimedia (Audio,Video,MP3, Flash...) in Ubuntu 10.10 (Maverick Meerkat)

The Medibuntu developers have updated their repository with additional multimedia packages for the current Maverick Meerkat release of Ubuntu,  Medibuntu, an acronym for "Multimedia, Entertainment & Distractions In Ubuntu", is a repository of packages that can't be included in the default Ubuntu distributions for legal reasons, such as copyright, licenses or patents.


Ubuntu 10.10 Required the foll0wing steps to Run Multimedia files like MP3, AVI, Mpeg, Flash file etc...

In Ubuntu 10.10 "
Maverick Meerkat", the universe, multiverse and restricted repositories are activated by default.

For installing Multimedia files you need to add medibuntu repositories.

Run the follwing in command mode it will add medibuntu repositories in your sources list
$ sudo wget http://www.medibuntu.org/sources.list.d/jaunty.list --output-document=/etc/apt/sources.list.d/medibuntu.list
then Add the GPG Key:
$ sudo apt-get update && sudo apt-get install medibuntu-keyring && sudo apt-get update
Run
$ sudo apt-get update

Now you can Install non-free-codecs
$ sudo apt-get install non-free-codecs
It will enables your system to support for MP3 and various other audio formats, unrar. Java runtime environment, Flash plugin, Microsoft fonts, w32codecs etc!
You can install more codecs and DVD Support by using
$ sudo apt-get install libdvdcss2 libxine1-ffmpeg gxine mencoder
It will help you to run DVDs, AVI files and other mpeg codecs.

How to install latest skype in ubuntu 10.10 Maverick Meerkat (Graphical Method)

Graphical way of Skype installation in Ubuntu 9.10 Available in aroundthe web blog

1. Go to Applications –> Ubuntu Software Center.
see http://aroundtheweb.info/2010/09/how-to-install-skype-in-ubuntu-10-10-maverick-meerkat/

Friday, October 15, 2010

How to install latest skype in ubuntu 10.10 Maverick Meerkat

Skype is a simple user friendly software available in different platforms like Linux, Windows and MacOS, which enable you to make free calls(Audio,video and conference ) over the Internet by using VoIP protocol.

How to install Skype in Ubuntu

Add repository to Sources.list

$ sudo gedit   /etc/apt/sources.list

Uncomment the folliwing

deb http://archive.canonical.com/ubuntu maverick partner
deb-src http://archive.canonical.com/ubuntu maverick partner
 
Now
 
$ sudo apt-get update 
 
$ sudo apt-get install skype
 
Skype can also intall graphicaly 

Monday, October 11, 2010

Skype for Mobile Phone

 Open the skype put your nick, password, give it sign up and go, you're logged into your Skype, you'll see your contacts and all that stuff, if you have balance you can use skype on your phone, you can send sms, call more cheap anywhere in the world, or just Skype to Skype call or chat, as you would from your PC.

You have to have android 2.1 or 2.2 to work.

Also available for Iphone, Nokia N900 and Sony Ericsson Xperia.
Click here for free download Skype

Saturday, October 9, 2010

How to Install Ailurus in Ubuntu 10.10 (Maverik) - A Useful Ubuntu Tweak Alternative For Beginners

Ailurus is a GPL software, which aims at making Linux easier to use for beginners. Ailurus is available for Ubuntu, Fedora,Archlinux and Mint while Ubuntu Tweak is a dedicated Ubuntu only application.
Ailurus Features

  • 'Study Linux' feature included in Ailurus is pretty good at teaching the Linux basics to beginners. You can even set it to display Linux tips each time you login to your system.
  • Install lot of  useful applications easily.
  • Enable/Disable a number of third party repositories quite easily.
  • Clean APT/YUM cache.
  • Display of basic hardware information which is so useful at times.
  • Backup and recover APT/YUM status
  • Change GNOME settings. Ailurus invokes GConf API, to change GNOME settings.
  • Easily enable Gnome Control Center using Ailurus.
 How to install Latest Ailurus 10.06.93 in Ubuntu Lucid and maverik


Open a terminal and type the following


sudo add-apt-repository ppa:ailurus && sudo apt-get update
sudo apt-get install ailurus 


Goto Applications - System Tools - Ailurus.

Tuesday, October 5, 2010

How to get Free ubuntu 10.10 CD (Maverick Meerkat)


The Ubuntu ShipIt program, which provides free Ubuntu Desktop and Server CD’s to users , is now taking pre-order requests for free Ubuntu 10.10 desktop and server CD’s.


The ShipIt service can be used by users with low-bandwidth, intermittent internet connections or other reasons for being unable to download the latest Ubuntu release.
With requests now being accepted the order page duly notes: -
Ubuntu 10.10 (Maverick Meerkat) has not been released yet, They will  send you a CD after release. Note that delivery will take from six to ten weeks once it is sent.

Help ShipIt

The costs involved with providing access to Ubuntu for those unfortunate to get access to the swift and easy online downloads are great.
As such users should not take advantage of the ShipIt service unless otherwise unable to acquire an Ubuntu release.
The ‘Help ShipIt’ initiative allows users to help contribute to these costs, thus making Ubuntu accessible to people or communities who may not otherwise discover or use it.
More information on Help ShipIt and pre-orders for ShipIt CD’s head over to shipit.ubuntu.com

Monday, October 4, 2010

How To Configure Ubuntu To Open The Applications Menu With Windows Key

Most of the  keyboards today come with the Windows key on them.In Windows it is used for open Startmenu. You can add similar function in Ubuntu by using the following Command.

$ gconftool-2 –set /apps/metacity/global_keybindings/panel_main_menu –type string “Super_L”

Thursday, September 30, 2010

Simple wireless hacking : How to change the MAC address of a Windows machine

This will help you to  change the MAC address of a Windows machine.


Change Registry

This howto requires little knowledge on the Windows Registry. Also, make sure you have a good backup of your registry.
  • Goto command prompt and type "ipconfig /all", and
  • Note the Description for the NIC you want to change.
  • Not the MAC Address for the NIC you want to change
  • Goto command prompt and type "net config rdr", and remember the number between the long number (GUID) inside the { }. For example, for MAC address "00C095ECB794," you should remember "{1C9324AD-ADB7-4920-B02D-AB281838647A}". You can copy and paste it to the Notepad, that's probably the easiest way.
  • Go to Start -> Run, type "regedt32" to start registry editor. Do not use "Regedit."
  • Do a BACKUP of your registry in case you screw up the following steps.
  • Click on "HKEY_LOCAL_MACHINE on Local Machine" sub-window
  • Click on the root key "HKEY_LOCAL_MACHINE".
  • Click on the drop-down menu "Registry -> Save Subtree As" and save the backup registry in to a file. Keep this file in a safe place.
  • Go to "HKEY_LOCAL_MACHINE\SYSTEM\CurrentControlSet\Control\Class\{4D36E972-E325-11CE-BFC1-08002BE10318}". Double click on it to expand the tree. The subkeys are 4-digit numbers, which represent particular network adapters. You should see it starts with 0000, then 0001, 0002, 0003 and so on.
  • Go through each subkey that starts with 0000. Click on 0000, check DriverDesc keyword on the right to see if that's the NIC you want to change the MAC address. The DriveDesc should match the Description you recorded from step (a.-I.). If you are not 100% sure about the DriverDesc, then you can verify by checking if the NetCfgInstanceID keyword value matches the GUID.
  • If there is no match, then move on to 0001, 0002, 0003, and so on, until you find the one you want. Usually 0000 contains the first NIC you installed on the computer.
  • In this demonstration, 0000 is the NIC I selected.
  • Once you selected the subkey (i.e. 0000), check if there is a keyword "NetworkAddress" exist in the right side of the window.
  • If "NetworkAddress" keyword does not exist, then create this new keyword:
  • Click on the drop down menu "Edit -> Add Value".
  • In the Add Value window, enter the following value then click OK.
  • Value Name: = NetworkAddress
  • Data Type: = REG_SZ
  • String Editor window will pop up at this time
  • Enter the new MAC address you want to modify. Then click OK.
  • (There should not be any "-" in this address. Your entry should only consist of 12 digits.
  • If "NetworkAddress" keyword exists, make sure it shows the keyword type is REG_SZ, and it should show as NetworkAddress:REG_SZ: . This keyword might not have a value at this time.
  • Double click on the keyword NetworkAddress and the String Editor window will pop up.
  • Enter the new MAC address you want to modify. Then click OK. (There should not be any "-" in this address. Your entry should only consist of 12 digits).
  • Goto Start->Setting->Control Panel, and double click on "Network Neighborhood".
  • Select the Network Adaptor you just changed the MAC address.
  • Disable and enable the adaptor
  • At the command prompt, type "ipconfig /all" to confirm the new MAC address.

Tuesday, September 28, 2010

Ubuntu Versions

 Ubuntu Versions
AdjectiveAnimalVersion

Warty

Warthog

  4.10


Hoary

Hedgehog

  5.04


Breezy

Badger

  5.10


Dapper

Drake

  6.06


Edgy

Eft

  6.10


Feisty

Fawn

  7.04


Gutsy

Gibbon

  7.10


Hardy

Heron

  8.04


Intrepid

Ibex

  8.10


Jaunty

Jackalope

  9.04


Karmic

Koala

  9.10


Lucid

Lynx

  10.04


Maverick

Meerkat

  10.10

Saturday, September 25, 2010

How to Secure your Gmail account from Hackers ( How to set Gmail password recovery options )

Recently lots of problems are reported about gmail account passwd hacking.

Set your account password recovery options effectively.

How to set Gmail password recovery options

Log in to gmail

Now select Settings  from top right side of the screen.

 here select Accounts and Imports.
Bottom of the screen you can select Change account settings

Now it will open a new window with following


Now Select Change Password recovery options

Now it will ask for your current password  . enter your current password.


Now you can add/edit your security options

Alternate Email account

SMS Mobile Number

Security Question


and save

Thursday, September 2, 2010

New simple Installer in Ubuntu 10.10 'Maverick Meerkat'


 Ubuntu 10.10 Maverick comes with Simple user friendly installer. You can install Ubuntu 10.10 with limited computer knowledge. It also provide option for installing non-free software and codecs.


 Partitioning is probably the most important part of installation process and it is also made simple in ubuntu 10.10.

Wednesday, September 1, 2010

Free E-book: The Complete Guide to Web Design


Creating an online presence is just as important as getting your name out to your local consumers. Grow with the internet by learning how to pick the right type of design for your market as well as how to sell directly from your website. This step-by-step "E-Everything Guide" breaks down E-commerce step-by-step and comes with multiple free price quotes by phone/email from Web Design companies.

Get your free ebook Get it now

Monday, August 30, 2010

How to Change Windows Controls to Right side in Ubuntu 10.04

This is very difficult to mange left side control of Ubuntu windows.Simply you can change this setting.


1. Open up the gconf-editor tool
(
Open a terminal and type
$ gconf-editor
).
2. Navigate to apps-->Metacity --> general.
3. Double click the button_layout key.
4. Change the value of this key to menu:maximize,minimize,close.
5. Click OK and the change will occur immediately.

You can now close the gconf-editor tool.

Thursday, August 26, 2010

Thesis on Advanced Single-Stage Power Factor Correction Techniques

Five new single-stage power factor correction (PFC) techniques are developed for single-phase applications. These converters are: Integrated single-stage PFC converters, voltage source charge pump power factor correction (VS-CPPFC) converters, current source CPPFC converters, combined voltage source current source (VSCS) CPPFC converters, and continuous input current (CIC) CPPFC converters.

Integrated single-stage PFC converters are first developed, which combine the PFC converter with a DC/DC converter into a single-stage converter. DC bus voltage stress at light load for the single-stage PFC converters are analyzed. DC bus voltage feedback concept is proposed to reduce the DC bus voltage stress at light load. The principle of operations of proposed converters are presented, implemented and evaluated. The experimental results verify the theoretical analysis.

VS-CPPFC technique use a capacitor in series with a high frequency voltage source to achieve the PFC function. In this way, the input inductor is eliminated. VS-CPPFC AC/DC converters are developed, and their performance is evaluated. VS-CPPFC electronic ballasts with and without dimming function are also presented. The average lamp current control with duty ratio modulation is developed so that the lamp operates in constant power with a low crest factor over the line variation. The experimental results verify the CPPFC concept.

CS-CPPFC technique employs a capacitor in parallel with a high frequency current source to obtain the PFC function. The unity power factor condition and principle of operation are analyzed. By doing so, the switch has less switching current stress, and deals only with the resonant inductor current. Design considerations and experimental results of the CS-CPPFC electronic ballast are presented.

VSCS-CPPFC technique integrates the VS-CPPFC with the CS-CPPFC converters. The circuit derivation, unity power factor condition and design considerations are presented. The developed VSCS-CPPFC converters has constant lamp operation, low crest factor with a high power factor even without any feedback control.

CIC-CPPFC technique is developed by inserting a small inductor in series with the line rectifier for the conceptual VS-CPPFC, CS-CPPFC and VSCS-CPPFC circuits. The circuit derivation and its unity power factor condition are discussed. The input current can be designed to be continuous, and a small line input filter can be used. The circulating current in the resonant tank and the switching current stress are minimized. The average lamp current control with switching frequency modulation is developed, so the developed electronic ballast operates in constant power, low crest factor. The developed CIC-CPPFC electronic ballast has features of low line input current harmonics, constant lamp power, low crest factor, continuous input current, low DC bus voltage stress, small circulating current and switching current stress over a wide range of line input voltage.
Download this thesis.

Wednesday, August 25, 2010

Design and Implementation of computer Interfacing based Thermometer

The Project is classified into following four sections:
  1. Sensing section
  2. Measuring section
  3. Conditioning or amplification section
  4. Interfacing or data acquisition section.
  5. Display section.
Sensing and measuring section sense temperature and convert it into electrical quantity as voltage. Conditioning or amplification section amplifies the measuring section output, which is the input of data acquisition section. For conditioning we use non inverting amplifier. At data acquisition section we use analog to digital converter(ADC) for digital output and a multiplexer for converting ADC output from parallel to serial. The multiplexer output is sensed by a parallel port of personal computer by Matlab. Then the digital value is converted to decimal. From temperature versus voltage equation we get measured temperature.
Download this project.

Tuesday, August 17, 2010

Four Fingered Robotic Arm Project

This paper deals with the design, construction, analysis and control of a multi figured humanoid robotic hand. It uses a very effective mechanism .The mechanism has a revolute joints to provide different kind o motion to the links The mechanism consists of springs so that the weight of the system is balanced by these springs this reduces the torque required for the motion of the robot .The mechanism used for the fabrication of the robot are mainly PERSPEX and WOOD because of their light weight.

The robot uses the Japanese futaba servo motors for motion of links. The robot consists of four servo motors of the rating 6V and torque 3 kg-cm. The robotic hand can be controlled by both the computer and the micro controller. The robot is controlled in two ways Manual and Automatic. The robot picks the object with the help of software program made in Visual Basic .Net.

The control software consists of a GUI (Graphical User Interface) designed in Visual Basic .Net. The software provides the large flexibility in controlling the robotic hand.

Download this thesis

thesis on Adaptive Power and Rate Control in Third GenerationWideband CDMA Mobile Systems

This thesis proposes novel adaptive power control and rate change schemesand investigates the performance of a Wideband Code Division Multiple Access (W-CDMA)system in conjunction with these adaptive techniques. In these schemes, the transmit power and rate are adapted to the variations of the fading channel using adaptivethresholds based on the probability distribution function (pdf) of the predicted mobilechannel power values.

We define a policy similar to the traditional power control technique withthresholds except that the thresholds are set based on several regions of operation in ourAdaptive Transmitter Power Control (TPC) and Adaptive Seamless Rate Change (SRC)schemes. These regions are defined by means of the probability distribution function(pdf) of the total average channel power. The pdf is initially constructed based on thehistory of the predicted channel power values derived from the long-range predictionalgorithm. These regions can be defined such that the system operates at a constant ratioof energy per bit over noise power.In a 1-user model with one channel path, the pdf of the channel power would bean exponential or chi-square function with 2 degrees of freedom.

However, in a W-CDMAsystem, normally the rake receiver has several fingers. That is, at the receiver,the system either estimates or predicts the channel coefficients at each rake finger andperforms maximal ratio combining by multiplying each finger with its conjugate or chooses the ones with the highest energy and performs maximal ratio combining on theselected fingers.In a two-user system where the multi-access interference is modeled as the Standard Gaussian Approximation (SGA), the system performance and error probabilityof our W-CDMA system becomes similar to the one for our one-user system.Consequently, in a single user detector system, when all users adopt a similar policy fortheir adaptive power and rate control, the average total Multi-Access Interference (MAI)will be reduced. The resulting channel capacity of the system in this case will beincreased and the system may operate in a lower transmit power level.We evaluate the performance of these schemes using a detailed block diagramsimulation of a W-CDMA system.

We model and simulate all major components of thesystem including an accurate model for realistic mobile channels. We present simulationresults to verify that the proposed novel schemes are superior to the traditionalapproaches for transmitter power control and rate change. Furthermore, our simulationresults show that our proposed techniques reduce the effect of Multi Access Interferencein a multi-user system.

Download this thesis

How to Convert AVI file to FLV in Ubuntu Linux

You can easily convert FLV file to AVI and Vise versa with Simple commands

Convert FLV to AVI file: 
$ ffmpeg -i mavideo.flv mavideo.avi

Convert AVI to FLV file: 
$ffmpeg -i mavideo.avi mavideo.flv 

If  ffmpeg is not intalled
$ sudo apt-get install ffmpeg

Wednesday, August 11, 2010

Play Beautiful game Frogatto in ubuntu

Frogatto is a platform game in two dimensions. The protagonist of this game is a funny frog can jump, run, swim, while avoiding being hurt by the various monsters in each level.
It is currently available Frogatto version 1.0, which represents the first stable version of it.  Frogatto 1.0 is a classic platform adventure game is fun and fully playable.


Frogatto has more than 30 levels and a fully functional editor that allows you to create your own levels or, edit an existing levels.

How to Install Latest version Frogatto in Ubuntu
# sudo wget -O /etc/apt/sources.list.d/frogatto.list http://www.frogatto.com/apt/frogatto.list
# wget -O- http://www.frogatto.com/apt/key.gpg | sudo apt-key add - wget -O http://www.frogatto.com/apt/key.gpg | sudo apt-key add -
# sudo apt-get update && sudo apt-get install

Tuesday, August 10, 2010

Thesis on SHORT RANGE UNDERWATER OPTICAL COMMUNICATION LINKS

The future tactical ocean environment will be increasingly complicated. In addition to traditional communication links there will be a proliferation of unmanned vehicles in space, in the air, on the surface, and underwater. To effectively utilize these systems improvements in underwater communication systems are needed. Since radio waves do not propagate in sea water, and acoustic communication systems are relatively low bandwidth the possibility of high speed underwater optical communication systems are considered.

In traditional communication systems, constructing a link budget is often relatively straight forward. In the case of underwater optical systems the variations in the optical properties of ocean water lead to interesting problems when considering the feasibility and reliability of underwater optical links. The main focus of this thesis is to understand how to construct an underwater link budget which includes the effects of scattering and absorption of realistic ocean water.

The secondary focus of the thesis was to construct LED based optical communication systems. This required understanding the behavior of Gallium Nitride LEDs operated under intense electrical pulsing conditions. An optical FM wireless system was constructed for transmitting speech. An LED based Ethernet compatible digital communications system that was capable of operating at 10 Mbps was also constructed and packaged for underwater operation.

Download this thesis

Holographic Information Systems Thesis

Holographic Information Systems Thesis
The goal of this work is to investigate the use of holographic techniques for information processing and transmission systems. Until recently information has been processed and transmitted mainly electronically. With the advent of optical fiber communications the monopoly of electronics has receded in the telecommunications field, but the domain of information processing is still dominated by electronic processors.

This thesis follows a top-down approach to the design of processors that integrate both electronic and optical components. It begins with the design considerations of a compact, rapidly reconfigurable opto-electronic processor, which possesses an optical bus in addition to the traditional electronic bus. The optical bus takes advantage of the massive parallelism that is afforded by optics and can be coupled to a holographic digital memory, allowing rapid reconfiguration of the device. The capability of rapid reconfiguration gives rise to a new computational paradigm, where the reprogramming of the device can become part of the computation. We suggest additional applications of this processor, namely as a smart reading head for large scale holographic disk memories. Finally we present novel algorithms that were developed specifically to take advantage of the additional capabilities of our processor. The next section is concerned with the wavelength and angular tuning of strong volume holograms, both in the reflection and 90-degree geometries. Since photons have no charge, we need to rely on their wave properties to manipulate them, both for long-range transmission, such as telecommunications, and short-range transmission, such as on chip interconnects. In this section we investigate how volumeholograms can be used to selectively redirect information bearing light beams.

The final part of this thesis is concerned with material issues. Holographic recording of strong volume gratings is one of the most commonly used approaches, and photorefractive materials have a strong bearing on the overall performance of the final system.

Download this thesis

Monday, August 2, 2010

Googlubuntu – Search Engine for Ubuntu Linux Users

Googlubuntu is a Search engine based on google for linux users. ”Googlubuntu is using Google customer search to search all related articles and sources about Ubuntu and the others.
Googlubuntu resources are from: Ubuntu.com,  Edubuntu.org, Kubuntu.com, Launchpad.net, ubuntuforums.org, ubuntuguide.org, Kubuntuforums.net,  getdeb.net, guia-ubuntu.org, cesarius.net, tuxpepino.wordpress.com, ubuntulife.wordpress.com,

I Think it is useful for Linux users

An Impulse Generator Simulation Circuit


This thesis describes the creation of a simulation circuit to match the output of a Marx type Impulse Generator. The goal was to estimate the stray capacitance and insert that capacitance into the simulation circuit to effectively produce an output similar to that of the generator. An actual three-stage impulse generator was used as the base. Several different levels of impulse voltage were tested, and the output waveforms were captured. Research was conducted to formulate the stray capacitance and identify the locations of these capacitances in the generator itself. The simulation circuit was then subjected to several iterations, adjusting the capacitance values to attain an output as close as possible to that of the actual generator.

Conclusions of the research indicate that an effective simulation circuit can be created to give an output that is close to, but not exactly that of, the actual generator. In the research, several areas of error were identified in the actual generator that were not present in the simulation circuit. These areas are discussed in the thesis.
Download this project

CIRCUIT-LEVEL MODELING OF LASER DIODES


In all semiconductor laser diodes the thermal, electrical, and optical characteristics are integrally related. In this work, a new approach to the modeling of laser diodes that integrates electrical, optical and thermal effects is presented. Also, it is demonstrated how physical device models based on complex differential equations can be easily implemented in the object oriented circuit simulator f REEDATM. Implementations of a Double-Heterojunction Laser Diode (DHLD) and a Vertical Cavity Surface Emitting Laser (VCSEL) diode are described. Simulations and results for both the DHLD and the VCSEL diodes are presented for DC, transient, and Harmonic-Balance analyses.
Download this project

Saturday, July 31, 2010

TRANSMITTING BIOLOGICAL WAVEFORMS USING A CELLULAR PHONE


There exists a need to remotely monitor fully mobile patients in their natural environments. Monitoring a patient’s biological waveforms can track a patient’s vital signs or facilitate the diagnosis of a disease, which could then be treated to help prolong and/or improve the subject’s life. If a patient must be monitored without the delay associated with delivering data stored on a recording device, biotelemetry is necessary. Biotelemetry entails transmitting biological waveforms to a remote site for recording, processing and analysis. Due to the limitations of the currently popular methods of biotelemetry, this thesis proposes the use of the increasingly prevalent cellular phone system. An adaptor design is developed to facilitate biotelemetry utilizing the most common features of a cell phone, barring the need for cell phone modification, as required for affordability. As cell phones notoriously confound sensitive medical equipment, especially patient-connected devices, their use is often distanced from sensitive equipment. However, the desire to use cell phones to transmit biological waveforms requires their joint-proximity to patient-connected devices.The adaptor must amplify the waveforms while rejecting cell phone interference to achieve an adequate signal-to-noise ratio. As the frequency range of most biological data does not conform to the passband of the phone system, the adapter must modulate the biological data. To limit the adapter’s size and weight, this design exploits the cell phone’s battery power. Methods are also introduced to receive and reconstruct high-fidelity representations of the original biological waveform.
Download this project

WIRELESS BATTERY CHARGING SYSTEM USING RADIO FREQUENCY ENERGY HARVESTING

It seems these days that everyone has a cellular phone. Whether yours is for business purposes or personal use, you need an efficient way of charging the battery in the phone. But, like most people, you probably don’t like being tethered to the wall. Imagine a system where your cellular phone battery is always charged. No more worrying about forgetting to charge the battery. Sound Impossible?

It is the focus of this thesis to discuss the first step toward realizing this goal. A system will be presented using existing antenna and charge pump technology to charge a cellular phone battery without wires. In this first step, we will use a standard phone, and incorporate the charging technology into a commercially available base station. The base station will contain an antenna tuned to 915MHz and a charge pump. We will discuss the advantages and disadvantages of such a system, and hopefully pave the way for a system incorporated into the phone for charging without the use of a base station.

Through the years, technology has allowed the cellular phone to shrink not only the size of the ICs, but also the batteries. New combinations of materials have made possible the ability to produce batteries that not only are smaller and last longer, but also can be recharged easily. However, as technology has advanced and made our phones smaller and easier to use, we still have one of the original problems: we must plug the phone into the wall in order to recharge the battery. Most people accept this as something that will never change, so they might as well accept it and carry around either extra batteries with them or a charger. Either way, it’s just something extra to weigh a person down. There has been research done in the area of shrinking the charger in order to make it easier to carry with the phone. One study in particular went on to find the lower limit of charger size [1]. But as small as the charger becomes, it still needs to be plugged in to a wall outlet. How can something be called “wireless” when the object in question is required to be plugged in, even though periodically?

Now, think about this; what if it didn’t have to be that way? Most people don’t realize that there is an abundance of energy all around us at all times. We are being bombarded with energy waves every second of the day. Radio and television towers, satellites orbiting earth, and even the cellular phone antennas are constantly transmitting energy. What if there was a way we could harvest the energy that is being transmitted and use it as a source of power? If it could be possible to gather the energy and store it, we could potentially use it to power other circuits. In the case of the cellular phone, this power could be used to recharge a battery that is constantly being depleted. The potential exists for cellular phones, and even more complicated devices - i.e. pocket organizers, person digital assistants (PDAs), and even notebook computers - to become completely wireless.

Download this project

Thursday, July 29, 2010

Blam, a simple feed reader for GNOME

Blam is an application for GNU / Linux designed for the desktop environment GNOME . This is a very simple feed reader with a very simple interface from which we can access our feeds. Blam also allows us to add, delete or edit a feed easily. It also gives us the ability to import OPML feed lists, and export the lists created with the program itself.

How to Install Blam in Ubuntu
Blam is available  from the official Ubuntu repositories.
 
$ sudo apt-get install blam

Monday, July 26, 2010

A Digital Water Level Meter


Here's an analog water level meter that uses commonly available parts. The output is a voltage that is proportional to the water level.

The monostable is a 555, eg. LM555 or NE555, or could be a ICM7555, the CMOS version of the 555 for lower power consumption. The width of the pulses out of the 555 is proportional to the water level. R7 and C5 form a low pass filter to smooth the DC value of the pulse train. Their values can be increased to lower the cutoff frequency if dynamic response is not required. The lower the cutoff frequency the more noise immunity the device will have.

The zero offset is removed in the differential stage IC1B. The LM324 is a quad op. amp. that can be used in single supply configuration. The maximum output of an LM324 is about 1.5V less than the supply voltage Vcc. The supply can be from a 3-terminal regulator eg LM7808,LM7812, LM7815 - or LM78L08, LM78L12 or LM78L15. The voltage input to one of these regulators needs to be about 2V higher than the regulated voltage. For low power applications a micropower regulator like the MAX666 could be used.

The Link To Whole Project, click here

Digital Systems & Microprocessors Project


The project will give you the opportunity to use the RTL technique for the design of a system of modest complexity: a reverse polish calculator with 4 significant decimal digits. The project has various milestones among the specifications to allow you to do a top-down design and to tackle the project at various levels of complexity with plenty of scope for individual creativity. A major aspect of the project will be to explore different approaches of developing the different hardware blocks taking special account of meeting spec and synthesis in hardware.
Download this project

Thursday, July 22, 2010

Robotic Arm Project


The main objective of this project is to create the virtual representation of a robot’s working environment. This virtual space gives user the ability to test the physical system without ever having to set up the physical environment and also user can practice without having to be on site. Another benefit of using a virtual space is that we can create any representation needed for the user. To control the robot in the real world, as well as the virtual world, we use MATLAB/Simulink to numerically analyze the inverse dynamics of the system. This allows us to specify the robot’s position that we want and then calculate the joint angles that will move the robot to that desired position. The robot will be used to manipulate a set number of objects with known positions within the system, real world or virtual.
Download this project

Solar Tracking System by Microprocessor

This project uses a stepper motor to control the position of solar energy collectors, using Intel 8085 Microp . The software includes the positioning of collectors through stepper motor & data acquisition and processing in Microprocessor.

OPTICAL SENSING AND PROCESSING :

LDR ( Light Dependent Resistance) is used as a sensor for generating an electric signal proportional to intensity of light falling on it. LDR is mounted at the focus of reflector which is directly mounted on solar energy collectors.

STEPPER MOTOR AND ITS DRIVING CIRCUIT:

The stepper motor requires that its stator windings should be energized in a programmed sequence to cause the motor to run in a given direction and with a required speed.

For Downloading Whole Project

Monday, July 12, 2010

Home Automation System with Mobile Communication and Computer Interfacing

Home Automation System with Mobile Communication and Computer Interfacing
Main Features of the projects:
The Home automation project is divided into two parts:
  1. The electrical appliances with computer parallel port interfacing
  2. The remote external on/off of the whole system
The first part contains a interfacing circuits which should be connected with the PC via a parallel port. The computer should need a high definition language such as C, C+, C++, QuickBasic, visual c, c# etc according to user’s choice. The program will define the address of the LPT port for the computer as well as function and status of the devices whether the devices are on or off.
The second part contains a setup which could turn on/off the whole system externally. Here we use cell phone as it is used widely in modern life. The setup contains a mobile set, a decoder and programmable microcontroller. The decoder will decode the signal from mobile to microcontroller and the microcontroller trigger the relay which is connected to the interfacing unit.
Objective/Task of the project:
The main objective of the project is:
  • To generate and develop a circuit that will accept the signals from a computer interface via a port and control the switching of the relays which in turn will control the appliances running on mains power.
  • To analyze and develop the instruction codes utilized by the interface to interact with the device using a high-level programming language.
  • To design a DTMF decoder circuit which decodes the frequency of the button assigned to mobile phone.
  • To connect the decoder with a PIC microcontroller and programming it with necessary condition.
  • Finally Implement and combine the whole system.

For Downloading Whole Project

Robotic Project

Robotic ProjectThe Lego Mindstorms NXT has been in the market since 2006 and its potential for robotics application is increasing throughout the years. The Lego Mindstorms NXT educational kit consists of several types of sensors and motors, allowing the robot to be programmed to respond autonomously to different types of situations.

The traditional four-directional analog controller allows motion but is restricted by only the four direction keys. The Nintendo Wii remote, which is otherwise known as the ‘Wiimote’, expands on the traditional controller by embedding an accelerometer and Infrared (IR) sensors. The accelerometer allows motion capture of the Wiimote along the XYZ axis as well as detecting the roll, yaw and pitch. Combined with the IR sensors, it allows very accurate motion tracking. With the motion tracking capability on top of the traditional controller capabilities, integrating the Wiimote to a robotics kit will allow the robot to be controlled with more finesse.

For Full Project Download here

Friday, July 9, 2010

Mini PSU for Breadboard

Mini PSU for Breadboard
The purpose of the project is to create a 5V mini Power Supply Unit for breadboard. The project can be connected to 8-18 DC power source, or 9V battery. During construction, put the components in as tight as you can, while verifying that you can in fact complete the circuit on the underside of the board without adding any wires. The main component in this project is voltage regulator LM 7805.

To build this you need:

Some electronics skills. Soldering, knowing how to follow a circuit diagram etc..
  1. 1 voltage regulator LM 7805
  2. 1 10uF capacitor
  3. 1 1000uF capacitor (you can use any big electrolyte capacitor here, doesn't have to be exactly 1000uF)
  4. 1 100nF capacitor
  5. 1 LED for power on indication
  6. 1 resistor to take the voltage down from 5V to whatever your LED runs at
  7. 1 screw terminal for the input voltage
  8. 1 switch for input voltage on/off
  9. 1 perfboard, the type with copper eyes, not stripes
  10. 1 2-pin connector to plug the unit into the breadboard
more

Wednesday, June 30, 2010

AVR Wireless Streaming Radio

AVR Wireless Streaming RadioThe project allow you streaming your radio broadcast wirelessly over internet. The wifi radio built using an Asus WL-520gu wireless router, an old USB audio headset, AVR ATmega8 and other part. If you are interested to build Wireless Streaming Radio, here is the requirement you need to prepare : Wireless connectivity through existing Wifi network; Audio output (preferably 44kHz, 16 bit stereo); Shoutcast/MP3 streaming audio decode; A display to indicate the station and currently playing song; An integrated amplifier and speaker(s); Several built in station presets; and Simple user interface, using standard radio controls (volume, tune, etc).

Gary Dion said that the radio can be controlled over Ethernet and also IR transmitter. The firmware in the project is written in C. You can download the source code here and router shell script. The project inspiration come from Jeff Keyzer.

Monday, June 28, 2010

Learn the Top Tips for Choosing Mobile Computers

The process of choosing the right mobile computer for your business can seem like a daunting task. Yet with a little guidance you can select the computer best suited for your environment and workforce. This white paper provides tips on what to look for when purchasing mobile computers.

Get your free ebook Get it now

Sunday, June 27, 2010

100 Gnome High Quality Wallpappers


 Download 100 High Quality Gnome Wallpapers from here
Download From Here

MIDI-Controlled Digital Synthesizer

4bitsynth is 4 bit MIDI-controlled digital synthesizer inspired by the NES. The project is built around Atmel AVR ATMega48 The digital output is put through an R-2R resistor ladder to get the analog waveform. It has three type output : Square wave, Triangle wave and noise.

Project Features Detail :
Triangle

* One volume (uses up/down counter)
* Pitch sweep (up/down, optional looping)
* Standard pitch bend
* Fine pitch bend


Square

* Three duty cycles: 12.5%, 25%, 50%
* Volume decay (optional looping)
* Pitch sweep (up/down, optional looping)
* Standard Pitch bend
* Fine pitch bend

Noise

* Two modes: 93-bit and 32k (think NES)
* Volume decay (optional looping)
* Pitch sweep (up/down, optional looping)
* Standard pitch bend
* Fine pitch bend
more

Thursday, June 24, 2010

Optical String Tuning Tool, AVR AtMega8

Stimmmopped is AVR ATmega8-based project that will assists you in tuning your string instrument to a given tone. It utilizes the stroboscopic effect to give feedback about the adjustment of your instrument. When the frequency that you chose has tone then the two LEDs on the board blink. Two lines are projected at a fixed position on the string when the string vibrates with the correct frequency. If frequencies don't match, the lines appear to be blinking or moving to the observer's eye. The moving or blinking effect decreases with decreasing difference between the two frequencies.

"The project has two switches to choose the tone and instrument. Switch S1 toggles the current mode of the menu, which is either "choose instrument" or "choose tone". The 7-segment display displays the current selection. In the instrument selection mode, the display is lit up a bit brighter. Switch number two (S2) selects the tone or instrument in the given mode." said Madex (Martin), the designer.

Source Code And Layout

Tuesday, June 22, 2010

How to Find the Most Memory taking process in Ubuntu Linux

Some Times system administrators need to kill the memory eater process. When your system become slower, check the following command and find the memory eater.


Open a terminal and Type the following command

#ps aux | sort -nrk 4 | head

PIC based Animation Tile Display

PIC based Animation Tile Display, Display, LED, project, PIC, PIC24FJ64GA002, animation, puzzle
Puzzlemation is an expandable platform of light and animation based on PIC24FJ64GA002. It can be used to create things as diverse as modular animated signs that can be changed by rearranging its tiles, to a uniquely animated puzzle. This project’s display is made of a number of tiles, about 2 inch square with an 8 x 8 array of color LED pixels. Each tile is individually powered and animated, so user can freely pick them up and re-arrange them. To set up a display, the tiles are placed in a special tray. Animations are downloaded into the tray via Ethernet and stored locally on an EEPROM, or loaded via an SD card. The tray broadcasts the animation to each of the tiles, and then synchronizes them.

John Peterson, project designer, said that the display is completely reconfigurable. If the pieces are left in the tray, the animation can be updated continuously over the Ethernet connection. If the tiles are removed from the tray, they’ll display the animation for several hours with their own re-chargeable battery power. Once the animation is synchronized and running on the tiles, user can pick them up and place them anywhere.

Download:
Project Documentation, Source Code and Schematic(zip)
tag :
Display, LED, project, PIC, PIC24FJ64GA002, animation, puzzle

Monday, June 21, 2010

Ethernet WAN, Routers or Switches Making the Right Choice - Free E-book

In this white paper learn the value proposition and difference between these three tools, so you're able to make an informed decision:
  1. Ethernet WAN
  2. Routers
  3. Switches

Get your free ebook Get it now

Sunday, June 20, 2010

LED Psychedelic Lights

LED Psychedelic Lights,PIC LED psychedelic lightc System
This project aim is to reproduce the old style psychedelic lights system that was very popular in the 70s. Being in the "digital era", the technical solutions adopted are quite different from what was characterizing their predecessor system. Old style lamps have been replaced by three high power LEDs; all filters, previously implemented with analog components, have been realized with digital processing techniques; input stages have been replaced by one A/D converter and one digitally controlled variable amplifier, that is able to warranty the best signal amplitude for the system.

The project requirements are related to technologies adopted: high power LEDs need to be driven with a constant current; digital filters need a fast DSP engine, to be implemented, and an A/D converter is required to transform an audio signal in a numerical representation. Control data communications between central processing unit and external analog components require to have an SPI on board and, last but not least, the capability to link the system with a PC could be very useful for firmware debugging and for tuning some parameters in real time without needing expensive developing tools. The project is designed by Marco Signorini.
[link]

Monday, June 14, 2010

PIC Serial Port Servo Controller

PIC Serial Port Servo Controller
The PIC Based servo controller is a small project that allow you to control some robotics. The project uses a PIC16F84 microcontroller from Microchip to drive servo motors and digital outputs. It receives commands from a host computer via a standard RS232 serial interface.

To control the servos and outputs we need to send commands to the PIC. Some of the commands are single byte commands; some however require two bytes. The first byte always contains the command and the channel to which the command applies. We will call this the 'Command' byte. The second byte (when needed) will contain data for the command; we will call this the 'Data' byte and is used when we need to set the servo offset or position for example, said Ashley Roll, the designer.

The command byte is split into two nibbles (4 bits), the upper one defines the command to execute and the lower defines the channel (which servo or digital output) is to be affected.

download : PIC program | Schematic

Saturday, June 12, 2010

AVR Radio Frequency Keypad

Radio Frequency KeyPad
The AVR based RF Keypad is remote controller that emits an RF code every time you digit the correct combination on its keyboard. You can use this project to replaces remote controls based on MM53200, UM3750 and UM86409. There are three different combinations for three different actions can be entered at program-time. The keyboard layout also customizable. You can use any matrix up to 4 rows by 4 columns keyboard layout and assigning your own ASCII codes to each key.

Besides emits RF, you can use it as serial keyboard to PC (requires a polarity inversion) or Basic Stamps by drop off the RF part. Keypresses are available as ASCII codes at pin 3. AVR RF Keypad is designed by Alberto Ricci Bitti.

Download : Schematic and Hex File

Wednesday, June 9, 2010

How to Enable Multimedia Support (MP3, Mpeg4, Divx, 3gp, avi) in Fedora 13

How to Enable Multimedia support in Fedora 13

By default fedora will not support MP3, AVI, Divx, 3gp, Mpeg4 etc.

Simply you can add this features in Fedora 13


Open a terminal and become root or Login as root user, then run this command:


# rpm -ivh http://download1.rpmfusion.org/free/fedora/rpmfusion-free-release-stable.noarch.rpm
# rpm -ivh http://download1.rpmfusion.org/nonfree/fedora/rpmfusion-nonfree-release-stable.noarch.rpm

Install all other plug-ins

# yum -y install gstreamer-plugins-bad gstreamer-plugins-ugly xine-lib-extras-nonfree gstreamer-ffmpeg

After successful installation you can rum MP3 files


You can install Popular Media VCD/DVD Player with MPEG, QuickTime, AVI, and DVDs Support by using the following command


# yum install xine xine-lib libdvdcss

Doing this will also install a number of support libraries, including the libdvdcss plugin

Install Popular VLC Player in Fedora 13 by using the following
# rpm -ivh http://download1.rpmfusion.org/free/fedora/rpmfusion-free-release-stable.noarch.rpm
# yum -y install vlc


XMMS
Try the following for install xmms and make it MP3-capable

# yum install xmms xmms-mp3

Monday, June 7, 2010

Electronic Church Bell Controller based on Microcontroller AVR

Electronic Church Bell Controller based on Microcontroller AVRThis circuit designed by Antonis Pontikakis. It's used ATmega32 microcontroller as the main part. At the circuit, there are 2 24LC32 eeprom memories, the 1st for internal standard melodies and the 2nd one is for user's compositions.
As control, he created a menu that will be appeared on 4x20 LCD (Liquid Crystal Display). For browsing the menu there are 6 buttons in front of circuit's box (Menu, Up, Down, Enter, Start, Stop). All firmware only use 19 Kbytes flash memory of ATmega32 microcontroller writen in C compiled used Code Vision AVR compiler. If you need for more information don't be hesitate to send him an email.

Friday, June 4, 2010

Firefly simulator on microcontroller avr

Firefly simulator on microcontroller avrThe goal of this project was to build a LED-based device running on a microcontroller chip to mimic how fireflies might theoretically synchronize their flashing in nature. The device serves as a future model on how to implement a physical form of networking using a microcontroller chip.

To implement these goals, they created a 2D matrix of 8 "fireflies". Each firefly is represented by a node in the 2D grid, and a connection between any 2 nodes is represented by a pair of 2 LEDS: an "emmiter LED" and a "sensor LED". The fireflies are able to concurrently communicate and sense the signals emanating from surrounding fireflies using a form of one-directional LED communication. Each firefly is equipped with a fixed number of emitter LEDs and a fixed number of sensor LEDS, depending on the position of the LED within the matrix. For simplicity, we assumed that the fireflies’ positioned were fixed in time, i.e. they were not able to travel. Each firefly is equipped with an individual (i.e. independent) "brain" in the microcontroller code that processes the signals that it has sensed and tries to synchronize its own flashing with these surrounding fireflies. Like in any real world situation, each firefly flashes with a random frequency and phases and it adjusts these flashing parameters to conform to the overall flashing of the localized population.

Tuesday, June 1, 2010

A playable game of Tabletop Pong

Tabletop Pong - 92
When you're playing it, it feels like the video game representation of some real-life sport. You're bouncing a ball back and forth with another player, which at first glance sounds a lot like like table tennis, AKA ping pong-- and that would seem to explain the name. And yet, PONG is two-dimensional and free of gravity. The ball goes in a straight line, at a fairly constant rate of travel. And you don't play ping pong by rotating a wheel. Come to think of it, it's not a darned thing like ping pong. So what the heck is it?

Coming back to our main question now, what is PONG supposed to represent?

Our answer to this question is a game somewhere between pinball and ping pong: Two players each have a single knob that controls the position of a paddle along a short track. Using the paddles, they bounce the ball back and forth and try not to miss the ball, lest the other player score a point. The paddle surfaces are curved, so that the ball reflects in different directions depending on the position of impact. The paddles are powered, so that the ball keeps a fairly constant velocity between the two sides, and the speed gradually increases as the game is played. The playfield is level and has a dotted line down the middle, and the scores are displayed on either side of that line. There are top and bottom walls of the playfield that the ball can bounce off of. Sounds possible, right? So we built it.
[link]

Saturday, May 29, 2010

How to install Download Manager - Multiget - in Ubuntu 10.04 Lucid


MultiGet is an easy-to-use GUI  download manager for ubuntu / debian linux. It is Look and work like famous windows download manager flashget.

It supports resuming downloads,  It supports HTTP/FTP protocols . It supports multi-task with multi-thread on multi-server. You can reconfigure   the thread number without stopping the current task.

MultiGet runs natively on Linux, and it supports multiple operating system too.  It was tested on many system such as : Windows XP, ubuntu ,kubuntu, xubuntu, Fedora, opensuse, mandriva, MEPIS , PCLinuxOS, CentOS, Puppy,  FreeBSD, MacOS etc.

MultiGet is available from Ubuntu universe respository

Howto Install in Ubuntu
$ sudo apt-get install multiget

or you can use Synaptic Package Manager

Tuesday, May 25, 2010

Simple RS 232 Level Converter

Simple RS 232 Level Converter
When you need connect your Microcontroller Project to COM port in PC you need RS 232 converter. There are many chip to solve the problem like MAX232, DS275 etc. But if you need simple and chep for RS 232 converter, i though this circuit will be usefull for you. The design made by Wichit Sirichote.

Simple RS 232 Level Converter

"A circuit diagram shown above was used two small signal transistor, NPN and PNP transistors. Dash line separate transmitter and receiver circuit. For those who need only transmitter circuit can use above circuit (and GND (5) signal ). Technically the RS232C is -3V to -12V for logic '1' and +3V to +12V for logic '0'. The transmitter circuit uses PNP transistor, BC557. While in mark state the TxD signal is logic '1', Q1 turns off. TxD (pin3) then provides -9V (depends on what converter chip being used for COM1, say) to RxD (pin2). For space state, TxD control signal then becomes logic '0', which turns on Q1, the approx. +5V is then fed to RxD (pin2). With this method, while sending data has being made, TxD (pin3) must stable at -9V, say"
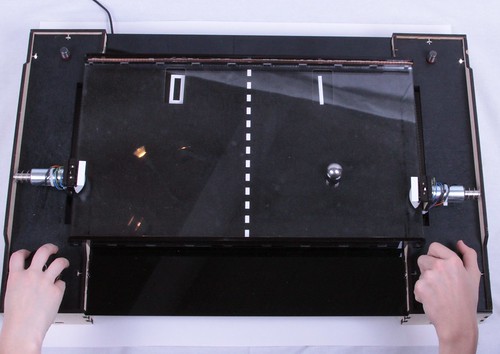
There also some modification from above circuit. For more detail you can download here.
[link]